Web Clients
The web portal can be accessed by any device with a web browser.
To do so, simply open your web browser and navigate to:
Where IPAddress is the IP address of the XLReporter server or web portal front end if set up.
 |
If user accounts are enabled, log in using a valid user account set up on the server and you have access to all the templates and reports on the server. Otherwise, you are navigated straight into the list of templates.
Note, if the website that the XLRweb application is installed under is not using port 80, the port number must be specified as part of the IP address in the URL. For example, if the website is using port 81, the URL to access the portal would be:
Guest Account
If user accounts are enabled in the project and you want to provide a simple login for casual users that can be used by multiple users at one time, in User Accounts, create an account named Guest. Assign the Guest account to a group with the privileges you want casual users to have.
Please note that while multiple users can be logged on as Guest at the same time, each user occupies one of the available client licenses.
Note that the Guest account’s User Preferences will not be retained after logging out. To retain preferences, user accounts must be created with the project.
User Preferences
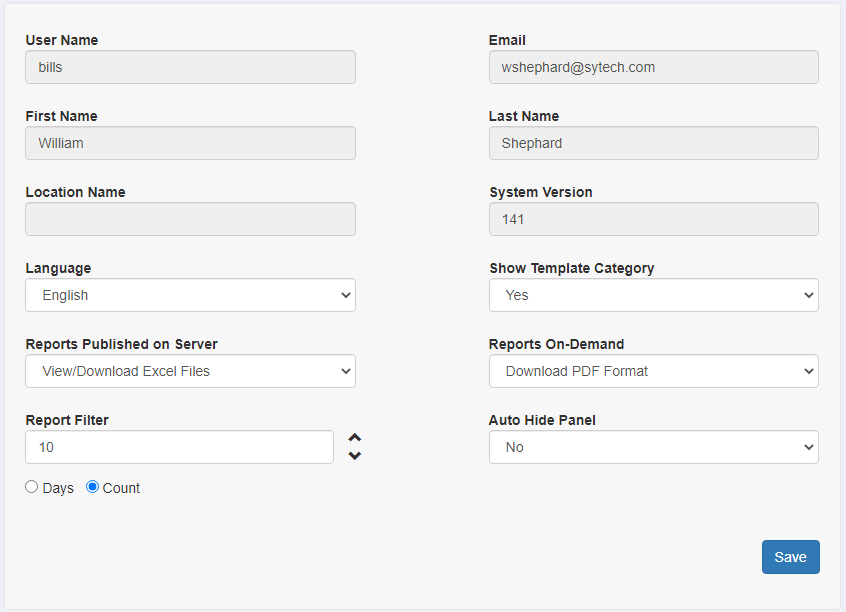 |
Once logged in, click on your name in the upper right to access the Preferences.
If the project has been configured with categories, Show Template Category can be toggled so the template list in the web portal to show categories. Note that if the project is not configured with categories this option is disabled.
Reports Published on Server determines the view and download format of the reports that have been created on the server by the scheduler or published to the server by other users. Select between View/Download PDF Files, View/Download Excel Files and View/Download HTML Files.
Reports On-Demand determines the download format of reports that have been produced on-demand in the client. Select between Disable Download, Download PDF Format or Download Excel Format.
Report Filter determines how many reports you can view from each template. This can be expressed in Days or as a Count.
If Auto Hide Panel is set to Yes, when a report is generated or viewed from a desktop or tablet, the left panel is hidden and the report becomes full screen automatically.
Click Save to store the settings.
Viewing Scheduled Reports
 |
When a template is selected that has existing reports on the server, a list of the reports is displayed. Select any report to view it in the web browser. Note that the format that is shown is the one selected in Preferences.
The report can be downloaded by selecting the download option in the title bar.
 |
To hide the left panel and view the report full screen, click the  button. To bring the left panel back, click the
  button. If you would like the left panel to be hidden automatically whenever you view a report, go to Preferences and set Auto Hide Panel to Yes.
On Demand Reports
Templates can be designed to allow users to specify parameters that drive the report. To see the parameters, select a template.
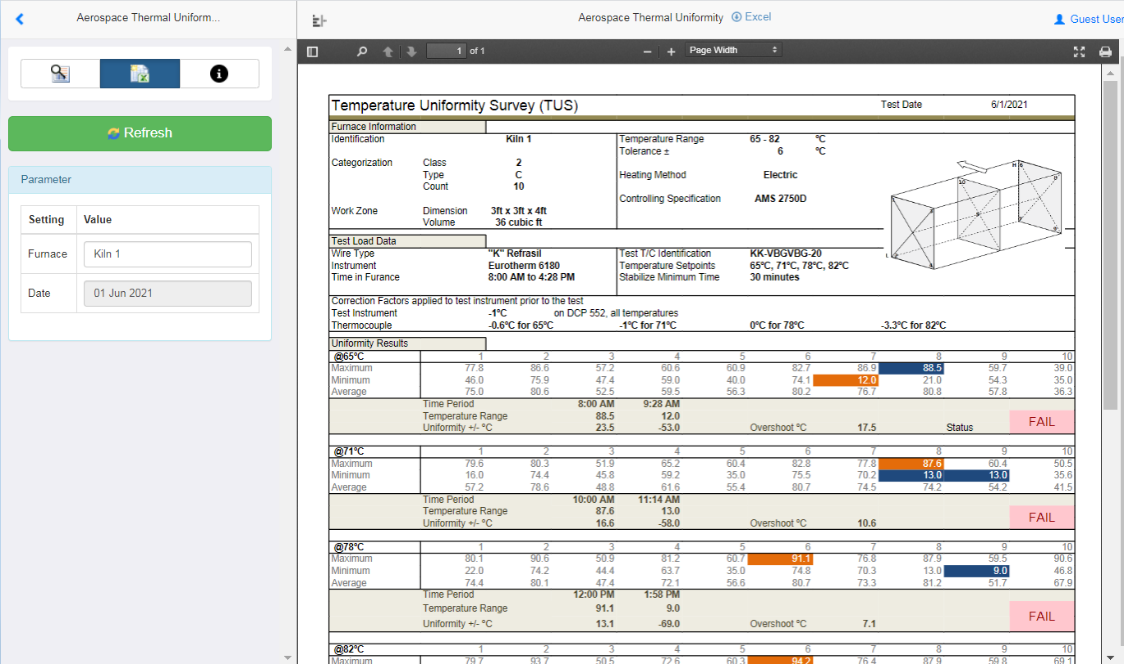 |
The parameters are listed in the left panel for the template.
In the above example a parameter panel is used to prompt for the Furnace name and a Date. A versatile set of entry panels is provided in XLReporter.
The report can be downloaded by selecting the download option in the title bar.
|
On desktops and tablets, to hide the left panel and view the report full screen, click the button.
To bring the left panel back, click the button. If you would like the left panel to be hidden automatically whenever you generate a report, go to Preferences and set Auto Hide Panel to Yes.
Responsive Viewing
Responsive viewing causes the report to respond to the viewport of the device There are 3 sizes supported:
Small (mobile phone)
Medium (tablet)
Large (PC)
This can be done in two ways:
Designated Sheet(s)
In the template workbook, you can designate one or more worksheets for a specific device size by adding “small” or “medium” to the worksheet name.
When the report is generated, if the device is small, any worksheet containing “small” is shown while any other sheet is hidden. Same for medium.
For large, any sheet designated “small” or “medium” is hidden.
Getting Started
When creating a new template from the Template Studio, check Import Existing Workbook and click OK. From the Import folder select ResponsiveDesign.xlsx. This template provides guidelines and sample layouts for all 3 available sizes.
Named Ranges
In the report template you can define one or more ranges as the elements to show when a device of a certain size is used.
For example, if the report contains 15 minute data over the day along with a summary, when viewing the report on a large device like a PC you may want to see everything but when viewed in a small device like a phone you may only want to see the summary.
To designate a range for a specific device size, you must assign a name to that range with the device size, e.g., name cells $B$4:$E$8 as Small. If you want multiple ranges to display for a particular device size, each range should be named Size_Number, e.g., Small_1 and Small_2.
You can designate both Small and Medium ranges. For large devices, the entire report is shown.
When applying a name to the range, be sure to set the Sheet to the specific worksheet containing the range. Only names with a sheet set to a specific sheet are considered, names scoped to all sheets are not considered.
To fit the ranges onto a single worksheet widthwise, your ranges should not exceed 600 pixels. When the range is rendered for the report for the device, if the width is less than 600, the range is resized to as close as 600 pixels as possible to provide you the best view for your device without having to do any resizing.
By default, when ranges are stacked for small or medium, a horizontal page break is inserted to attempt to prevent a range from bridging over 2 sheets. If this is restrictive page breaks can be added manually. When defining the range name, set the end of the name to “_PB”, e.g., “Small_2_PB”. When this range is stacked, a horizontal page break is inserted before the range.
Customizing the Portal
The following options can be customized for the web portal. These changes are made in the on the server from the Project Explorer from the File menu by selecting Project Settings. Web Portal.
 |
Changes are displayed on a new login. If they are not, the browser cache may need to be cleared first.
Titles
Main Title
The main title is seen on the Login page as well as at the top of the template list. By default, this is XLReporter.
Welcome Caption
The welcome title is seen above the welcome screen after logging in to the portal. By default, this is Welcome to XLReporter.
Images
Report Image
The Report image is seen in the menu after a report template is selected.
The image dimensions are 32 x32 pixels.
 |
On Demand Image
The On Demand image is seen in the menu after a report template is selected.
The image dimensions are 32 x32 pixels.
 |
Info Image
The info image is seen in the menu after a report template is selected.
The image dimensions are 32 x32 pixels.
 |
Main Image
The logo image is seen in the upper left corner of the portal after logging in.
The image dimensions are 78 x50 pixels.
 |
Welcome Image
The welcome image is seen on the home page of the portal after login.
The image dimensions are 800 x 650 pixels.
 |