Data Entry with Date Settings
Setup a Data Entry Connector
This section can be skipped if the connector was setup in the previous chapter.
From the Connect tab on the right-side Tools menu of the Project Explorer select Connectors.
 |
Click Add.
Expand XLReporter and select the Manual Data Entry values connector.
Enter the Connector Name and the connection to the Primary Database.
 |
If you do not have a database, use or make a copy of the Access database called DB_Form.mdb, located in the Data folder of the project.
Design a Data Entry Template
Data Entry Forms can address a wide range of data entry requirements and can contain powerful features such as calculations, formatting, and validation. Their design is performed in the Design Studio or from the add-in in Microsoft Excel.
Open the Template Studio from the Project Explorer from the right-side Tools tab under the Template Design section by selecting Studio
Select XLReporter, Template New (Excel) or File, New (XLReporter Template Studio).
 |
For the Name enter Daily Turbidity and an optional Description
Under Type, select Data Entry Form
Check Import Existing Workbook
Click OK and choose the file basin-turbidity.xlsx
Layout
The form contains workbook features such as labels, headings, formatting, and formula in the H column. The formula in D4 equals C9 and is formatted just to show the date.
 |
The above example is a daily form requiring 4-hour turbidity readings of the process which will be entered in the blue cells.
Unlock the cells that are used for data entry, i.e., the blue cells in the above example.
Highlight $D$9 to $G$14.
Select Format from the menu and click Unlock Cells (Template Studio) or right click, select Format Cells and under the Protection tab uncheck Locked (Excel).
Create a Database Table
A database table is needed to receive the data entry values when they are entered. When creating a database table, specify column names that reflect the information in the form.
Open the Database Manager by selecting Connect, Tools, Database Manager (Template Studio) or XLReporter, Tools, Database Manager (Excel).
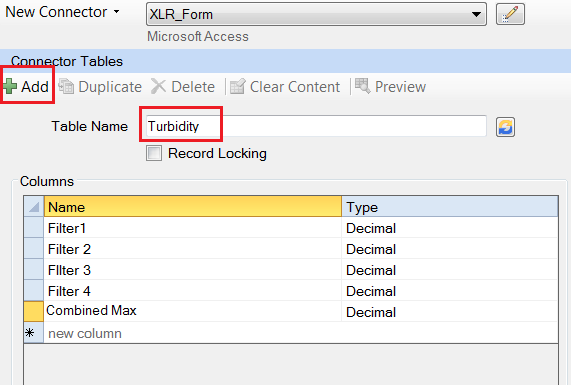 |
Select the data connector defined in the previous section.
Click Add to add a new table.
Enter a Table Name
Under Columns, specify the column Name and Type for each entry field as shown in the above image.
Click Accept and Close
Note that DateAndTime is a reserved column name and is automatically added to any tables created for a Manual Data Entry values connector.
Data Link
To link the template to the table created in the previous section, first select cell $C$9 and then select XLReporter, Data, Link (Excel) or Connect, Data, Link (Template Studio).
Note that by selecting cell $C$9 before opening Data Link, a level of configuration is performed automatically.
Setup Tab
The Setup tab is used to specify the connection and appearance of the form.
 |
Set the Connector to a form connector defined in the previous section.
The Form Type selection determines if the form will use one or multiple records for displaying and editing.
By Column
Display one record which is selected by Date or Custom settings
By Table
Display multiple records which is selected by Date, Time, or Custom settings
In this example, there are multiple records being displayed, one for each 4-hour period of the day.
Select Form Type By Table.
Select Period Daily.
Select the Interval 4 hour.
The Source shows a dropdown list of all the tables in the Connector. Only one table may be specified for each data entry form.
Select the table created in the previous section.
Links Tab
The Links tab determines associates the Cell(s) on the form and Column(s) in the database table.
No database links can be configured for the A column. This column is reserved by the application to indicate the status of the row by a color indicator.
 |
This tab is filled automatically using the selected cell on the template form.
Cell
The values are edited manually or by first clicking into a row in the grid and then clicking the cell on the worksheet.
Column
This is a drop-down list of all the columns in the form table.
Transfer
The transfer mode determines the transfer mode of data between the form and the database. Make sure any formula that is written to the database has a Transfer of Write otherwise it will be overwritten when the form is refreshed. In the above example, the Combined Max column is set to Write because it is a formula on the form.
Display Tab
The Display tab is an advanced setting and is shown by clicking >>. The settings on this tab are automatically updated except when the Custom option is selected on the Setup tab.
 |
Note that the display of the form is driven by the variables Form Start and Form End which represent the start and end date selected by the user.
Store Tab
The Store tab is an advanced setting and is shown by clicking >>. The settings on this tab are automatically updated except when the Custom option is selected on the Setup tab.
Note that when the form is stored, the date and time in cell $C$9 and down is used to update the database table.
 |
Click Save to save the changes. Close the Data Link window.
On Demand Designer
The On Demand Designer is used to provide methods for setting the variables in the form. Except for Custom forms, the settings in here are managed automatically.
To view the settings for the above example, select On Demand Designer.
 |
Note that the variables Form Start and Form End used in the form configuration are driven by a Date Interval control.
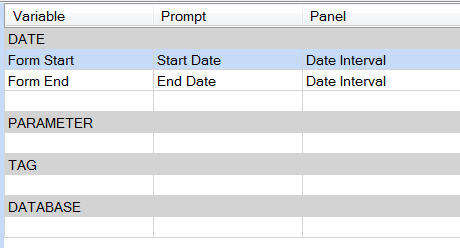 |
Deploy the Template
To perform data entry, open the Data Entry Forms application which can be done from the command line, clicking Preview in the Template Studio or from the Project Explorer on the right-side Tools menu in the Report section by clicking Data Entry Forms.
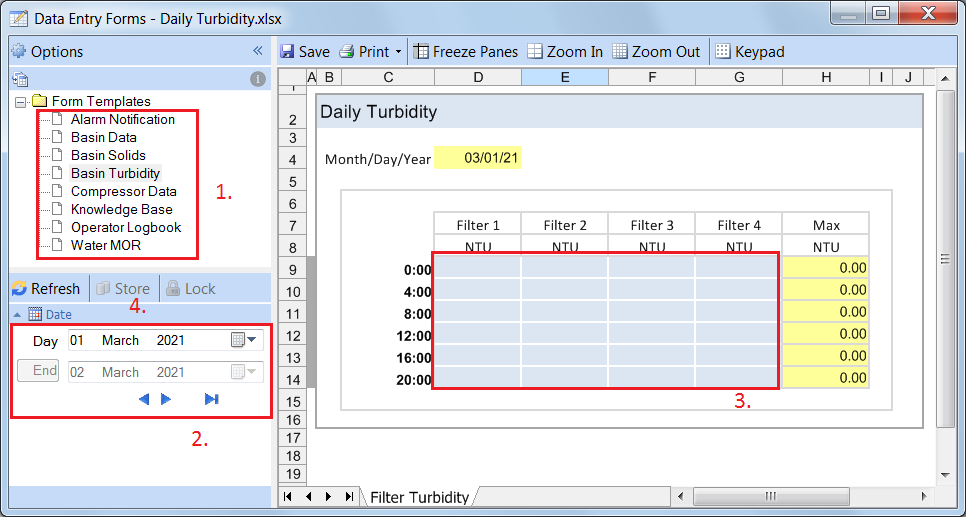 |
Select the Daily Turbidity form.
Select the Day.
Add entries to the form.
Click Store to save the entries to the table in the database.