Programming Interface
Introduction
In this section, we describe how to use XLReporter’s programming interface.
Schedules in XLReporter consist of an Action (what to perform) and a Trigger (when to perform), see the REPORT, Deploy Schedule Reports document for more details. Using the programming interface, all the actions of the scheduler can also be triggered from a third-party application that support VBA or .NET.
At runtime, the third-party application places the action into a processing queue and can either wait for the action to be completed or continue. For example, a pushbutton on an HMI screen places the action into the queue which processes in the background while the display continues refreshing. However, there are times when the third-party needs to be certain that the action has completed, this scenario is also catered for.
The processing queue is a FIFO (first in first out) of 256 actions.
Command line scripts
Reporting actions can be initiated from command line scripts using the application XLRrequest.exe as follows:
InstallPath\XLRrequest.exe action
For example:
Update the template sheet in the workbook called Flow, use the following command line:
InstallPath\XLRrequest.exe "UpdateSheet 'Flow.Template'"
Visual Basic and VBA
From a programming environment, actions are added using XLRrequest.dll (32 bit) and XLRrequest64.dll (64 bit). This DLL provides the following three methods:
XLRrequest Places the action in the queue.
XLRqueue Places the action in the queue with monitoring enabled.
XLRstate Monitors the action submitted with XLRqueue.
XLRrequest
This method is used if the caller does not need to the monitor the progress of the execution of the action. The syntax is:
XLRrequest action
For example:
To update the Template sheet in the workbook called Flow, the following program could be used starting with declarations:
For 32-bit applications:
Declare Function XLRrequest Lib "InstallPath\XLRrequest" (ByVal sAction As String) As Integer
For 64-bit applications:
Declare PtrSafe Function XLRrequest Lib "InstallPath\XLRrequest64" (ByVal sAction As String) As Integer
In the above, InstallPath is the install path of XLReporter.
Now the method can be used:
Private Sub UpdateReport()
Dim s as String
s = "UpdateSheet 'Flow.Template'"
XLRrequest s
End Sub
In the above, the action is UpdateSheet which requires the parameter Flow.Template (Workbook.Worksheet) which is enclosed in single quotes.
Multiple Actions
If multiple actions are executed and the requirement is that the processing of the actions starts when the last action is added to the queue, add “-qo” to the end of every action except that last one.
For example:
Set the variables Start Date and End Date and then initiate the update of a monthly report.
s = "Set 'Start Date' '2021-01-01'-qo"
XLRrequest s
s = "Set 'End Date' '2021-02-01'-qo"
XLRrequest s
s = "UpdateSheet 'Monthly.Template'"
XLRrequest s
Multiple commands can be initiated together. For instance, to update a sheet and then print the results both commands can be sent to the queue, and they will be completed in that order.
Monitoring the Queue
There are times when it is desirable to monitor the queue to ensure that the action has executed without errors before moving to the next step. In such cases, the action is issued with the XLRqueue function and then monitored with the XLRstate function.
XLRqueue action
XLRstate error len
Where action is the action string, error is an error string, and len is the length of the error string.
The return values from XLRstate are:
0 - completed with no errors.
1 - still pending.
3 - completed with errors returned in error.
For example:
Update the template sheet in the workbook called Flow and print it if the update was successful. The following program could be used starting with declarations:
For 32-bit applications:
Declare Function XLRrequest Lib "C:\XLReporter\XLRrequest" (ByVal sAction As String) As Integer
Declare Function XLRqueue Lib "C:\XLReporter\XLRrequest" (ByVal sAction As String) As Integer
Declare Function XLRstate Lib "C:\XLReporter\XLRrequest" (ByVal sErr As String, ByVal nLen As Integer) As Integer
For 64-bit applications:
Declare PtrSafe Function XLRrequest Lib "C:\XLReporter\XLRrequest64" (ByVal sAction As String) As Integer
Declare PtrSafe Function XLRqueue Lib "C:\XLReporter\XLRrequest64" (ByVal sAction As String) As Integer
Declare PtrSafe Function XLRstate Lib "C:\XLReporter\XLRrequest64" (ByVal sErr As String, ByVal nLen As Integer) As Integer
Now the methods can be used:
Private Sub UpdateReport
    Dim s as String
    Dim sErr as String * 255
    Dim nRet as Integer

    s = "UpdateSheet 'Flow.Template'"
    XLRqueue s

    nRet = XLRstate(sErr, 255)
    While nRet = 1
         nRet = XLRstate(sErr, 255)
       DoEvents
    Wend
    if nRet = 3 then
       MsgBox sErr
      Exit Sub
    End If

    ' print the report
    s = "PrintSheet 'Flow.Template' 'MyPrinter'"
    XLRrequest s
End Sub
Custom Category
Overview
Management connections in a template provide a rich set of features that extend the capability of a workbook (see DESIGN, Data Management document). One category of Management connections is Custom where users provide their own business logic in .NET classes.
An implementation of a custom category makes the business logic appear integrated into the product. When a method needs to be invoked, the input cell range together with the user specified parameters are passed to a .NET class method for processing which in turn returns the result for the report.
For example, the CT3log calculation for wastewater treatment is performed by taking the Temperature, pH and Cl Residual and applying the values in a CT3log calculation. Because of the complexity of the calculation, an efficient approach would be to send the values to a method in a .NET class and display the return value. Since this must be done over each row in the report, support for sending and receiving arrays is supported.
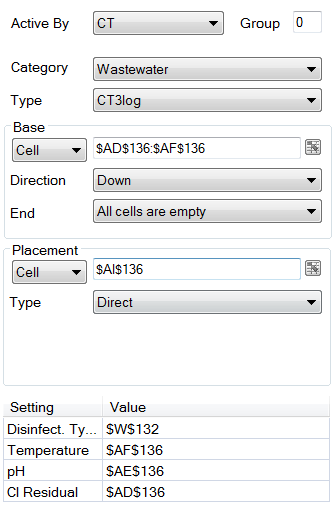 |
The parameter array passed to the method is determined from the range starting at $AD$36:$AF$36 going down until All the cells ate empty. The array results from the class are placed at $AI$36.
Implementation
There are two main steps in implementing a custom category
Specifying a meta file which determines the user interface
Providing a .NET class which contains the methods described in the meta file
Be aware that the performance of XLReporter can be affected by custom methods that take time to process and so they should be designed to handle errors and process the request without any delays.
User Interface
The user interface presented in the Template Studio in Data Manage is described by a meta file provided by the developer. The format of the file is XML and is named Categories_XXX.xml, where “XXX” is the category name. The file is installed in the root folder of the installation (e.g., C:\XLReporter).
Before the meta file is created, consider the methods that will be provided and the parameters they will require.
In the wastewater treatment example of the previous section, the user interface of the CT required for 3-log inactivation of G. lamblia from 4 parameters is shown. In this case, the meta file would contain:
<?xml version="1.0"?>
<MAN>
    <VERSION>
      <version>1.0</version>
    </VERSION>

    <CATEGORY>
      <display>Wastewater</display>
      <xla>xlrWastewater~Wastewater.cMain</xla>
    </CATEGORY>

    <Wastewater>
      <display>CT3log</display>
      <type>CT3log</type>
      <input>1</input>
      <inputtext>IDS_BASEDON</inputtext>
      <direction>2</direction>
      <target>1</target>
      <targettext>IDS_TARGET</targettext>
    </Wastewater>

    <CT3log>
      <dest></dest>
      <inputpar></inputpar>
      <valuetype>1</valuetype>
      <prompt>Disinfect.Type</prompt>
      <inputtype>30</inputtype>
      <value></value>
      <inputcol>0</inputcol>
      <reset>0</reset>
    </CT3log>
    <CT3log>
      <dest></dest>
      <inputpar></inputpar>
      <valuetype>1</valuetype>
      <prompt>Temperature</prompt>
      <inputtype>30</inputtype>
      <value></value>
      <inputcol>0</inputcol>
      <reset>0</reset>
    </CT3log>
    <CT3log>
      <dest></dest>
      <inputpar></inputpar>
      <valuetype>1</valuetype>
      <prompt>pH</prompt>
      <inputtype>30</inputtype>
      <value></value>
      <inputcol>0</inputcol>
      <reset>0</reset>
    </CT3log>
    <CT3log>
      <dest></dest>
      <inputpar></inputpar>
      <valuetype>1</valuetype>
      <prompt>Cl Residual</prompt>
      <inputtype>30</inputtype>
      <value></value>
      <inputcol>0</inputcol>
      <reset>0</reset>
    </CT3log>
</MAN>
The <CATEGORY> section
<CATEGORY>
  <display>Wastewater</display>
  <xla>xlrWastewater~Wastewater.cMain</xla>
</CATEGORY>
The section contains the Category text displayed to the user, the name of the .NET dll (xlrWastewater), the namespace (Wastewater) and the class (cMain) in the namespace which provides the methods.
Each method in the class is described in sections using the display text Wastewater
<Wastewater>
  <display>CT3log</display>
  <type>CT3log</type>
  <input>1</input>
  <inputtext>IDS_BASEDON</inputtext>
  <direction>2</direction>
  <target>1</target>
  <targettext>IDS_TARGET</targettext>
</Wastewater>
The section contains the <display> text which is displayed to the user and the method name used, <type>. The other settings in this section are used to define the Base settings displayed to the user display and do not normally need changing.
Each method has parameters shown in the Settings grid of the user display. In the example, the CT3log requires 4 parameters, the first described below:
<CT3log>
  <dest></dest>
  <inputpar></inputpar>
  <valuetype>1</valuetype>
  <prompt>Disinfect.Type</prompt>
  <inputtype>30</inputtype>
  <value></value>
  <inputcol>0</inputcol>
  <reset>0</reset>
</CT3log>
The section contains the <prompt> text which is displayed to the user. The <inputtype> describes the mechanism used for the parameter as follows:
0 - Textbox
20 - Drop-down list (No manual text)
30 - Cell picker (Supports manual text)
40 - Drop-down list (Supports manual text)
If the <inputtype> is set to 20 or 40, <inputpar> should contain a comma separated list of items to display from which the user can choose from.
The section contains <value> which is the default value displayed to the user.
The remaining settings in this section do not normally need changing.
Developing the .NET Classes
Please note that the following is documented in VB.net. C# is also supported.
The class library must be targeted to .NET Framework 4.8 or above. The library DLL must be copied into the bin subfolder of the install folder (e.g., C:\XLReporter\bin).
Every method in the class is configured as:
Public Function methodName(ByVal oRange(,) As Object, ByVal oPar(,) As Object) As Object(,)
Where:
methodName
The name of the method as specified in the custom categories XML file noted in the section above e.g., CT3log
oRange(,)
A two-dimensional array containing the range of data determined from the Base settings. The array is in the format Row,Column.
oPar(,)
A two-dimensional array containing every parameter from the Settings. The first element of the array is the parameter value and the second is the parameter type.
If the parameter type is 0, the parameter value is a 0 based index of the Column in the oRange array.
If the parameter type is 1, the parameter value is a treated as a static value.
Return Value
The method should always return a two-dimensional array in the format Row,Column that will be written to the report according to the Placement setting.
Example
Consider a method to add values from two columns for each row of data. This method is contained in a class named cMain in the CustomExample namespace within the class library xlrCustomExample.dll.
Meta File
The following meta file is created and saved as Categories_CustomExample.xml in the root of the install folder.
<?xml version="1.0"?>
<MAN>
    <VERSION>
      <version>1.0</version>
    </VERSION>

    <CATEGORY>
      <display>Example</display>
      <xla>xlrCustomExample~CustomExample.cMain</xla>
    </CATEGORY>

    <Example>
      <display>Add Values</display>
      <type>addValues</type>
      <input>1</input>
      <inputtext>IDS_BASEDON</inputtext>
      <direction>2</direction>
      <target>1</target>
      <targettext>IDS_TARGET</targettext>
    </Example>

    <addValues>
      <dest></dest>
      <inputpar></inputpar>
      <valuetype>1</valuetype>
      <prompt>Value 1</prompt>
      <inputtype>30</inputtype>
      <value></value>
      <inputcol>0</inputcol>
      <reset>0</reset>
    </addValues>

    <addValues>
      <dest></dest>
      <inputpar></inputpar>
      <valuetype>1</valuetype>
      <prompt>Value 2</prompt>
      <inputtype>30</inputtype>
      <value></value>
      <inputcol>0</inputcol>
      <reset>0</reset>
    </addValues>
</MAN>
Note, this can be copied and pasted into a text editor like notepad as a starting point when creating a meta file for custom management.
The meta file produces the following user interface:
 |
Class Method
Public Function addValues(ByVal oRange(,) As Object, oPar(,) As Object) As Object(,)
    Dim nEndRow As Integer = oRange.GetUpperBound(0)
    Dim oRet(nEndRow, 0) As Object
    Dim dTotal As Double

    ' cycle through each row of data in the range
    For r As Integer = 0 to nEndRow
        dTotal = 0

        ' cycle through the 2 parameters
        For n As Short = 0 to 1
            If oPar(n,1) = 0 Then
                ' parameter is an index, get value from range
                dTotal += oRange(r, oPar(n,0))
            Else
                ' parameter is a fixed value, use as is
                dTotal += oPar(n,0)
            End If
        Next n

        ' assign total to output array
        oRet(r,0) = dTotal
    Next r

    Return oRet
End Function
Template Configuration
Consider a template with the following data:
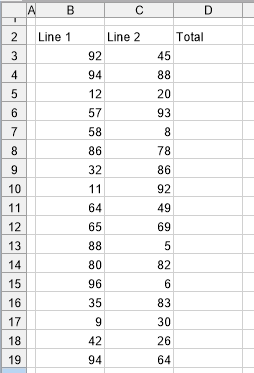 |
To use the custom Add Values to add Line 1 and Line 2 together, the management is configured as:
|
When the template is updated, the results are:
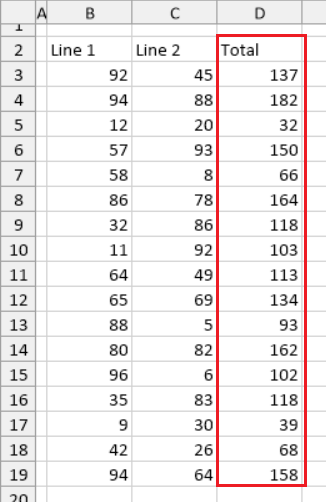 |