Data Entry with Custom Settings
Setup a Data Entry Connector
This section can be skipped if the connector was setup in the previous chapter.
Open Connectors from the Connect section of the Project Explorer.
 |
Click Add.
Expand XLReporter and select the Manual Data Entry values connector.
Enter the Connector Name and the connection to the Primary Database.
 |
If you do not have a database, use or make a copy of the Access database called DB_Form.mdb, located in the Data folder of the project.
Design a Data Entry Template
Data Entry Form can address a wide range of data entry requirements and can contain powerful features such as calculations, formatting, and validation. Their design is performed in the XLReporter Template Studio or from the add-in in Microsoft Excel.
This example will demonstrate the flexibility of data entry forms by a Custom template.
Open the Template Studio from the Project Explorer on the right-side Tools tab in the Template Design section by selecting Studio
Select XLReporter, Template New (Excel) or File, New (XLReporter Template Studio).
 |
For the Name enter Daily Logbook and an optional Description.
Under Type, select Data Entry Form.
Check Import Existing Workbook
Click OK and select operator-logbook.xlsx.
Layout
The form contains workbook features such labels, headings, formatting.
 |
The above form example requires logs to be entered as events occur in the process. A key element of the form is the Completed? cell $H$12. This has been configured as a drop-down list.
 |
To view the settings,
Select cell $H$12
From the Design tab (Template Studio) or Data tab (Excel), select Data Validation.
Create a Database Table
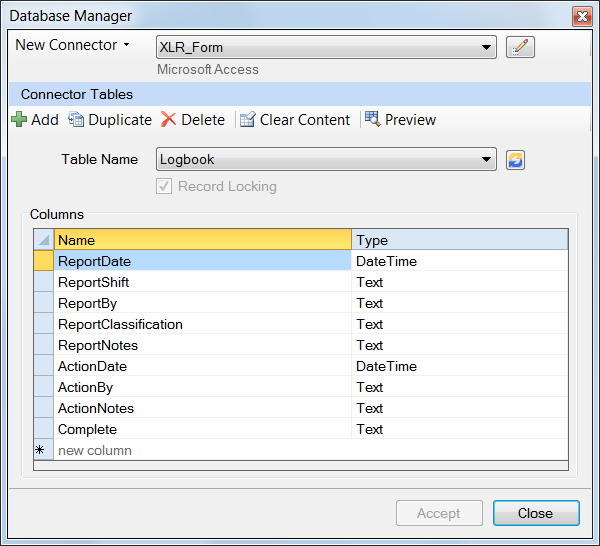
A database table is needed to store the data entry values when they are entered. When creating a database table, choose column names that reflect the information in the form.
Open the Database Manager by selecting Connect, Tools, Database Manager (Template Studio) or XLReporter, Tools, Database Manager (Excel).
 |
Select the data connector defined in the previous section.
Click Add to add a new table.
Enter a Table Name e.g., Logbook.
Check Record Locking.
Under Columns, specify the column Name and Type according to the above image.
Click Accept and Close.
Data Link
To link the template to the table created in the previous section, select XLReporter, Data, Link (Excel) or Connect, Data, Link (Template Studio).
Setup Tab
The Setup tab is used to specify the connection and appearance of the form.
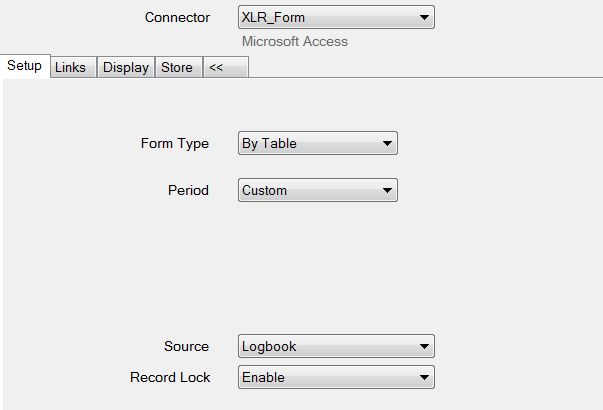 |
Set the Connector to the form connector configured in the previous section.
Select Form Type By Table.
Select Period Custom.
The Source shows a dropdown list of all the tables in the connector. Only one table may be specified for each data entry form.
Select the table created in the previous section.
The Record Lock option can be changed if the option is set when the table was created in the Database Manager. This setting takes effect when the form is deployed.
Enable
The Lock option is enabled for users with appropriate credentials to lock the form from edits.
Enable and Refresh
The Lock option is enabled for users with appropriate credentials to lock the form from edits and to refresh the input panel.
Links Tab
The Links tab associates the Cell(s) on the form and Column(s) in the database table.
No database links can be configured for the A column. This column is reserved by the application to indicate the status of the row by a color indicator.
 |
Assign the Cells and Columns as displayed in the image above
Display Tab
The Display tab is used to determine what is displayed on the form.
 |
The above configuration displays all incomplete records in descending order by ReportDate, using the status of the Complete field.
Configure to match the image above. Note that NULL will have to be manually entered in the Variable column.
For Custom Periods, the Custom option is provided for the Filter. When checked, the Filter grid is disabled, and the text area is enabled for the filter to be manually entered. This allows for more complex filter conditions to be manually specified.
 |
For example, if the Filter requires two conditions that where if either one is true, it should evaluate true, this can be set here using the OR operator.
Please note that if the Filter is manually entered it must follow SQL syntax exactly otherwise an error will result.
Store Tab
The Store tab indicates which record in the database will be updated. Careful selection of this setting is required to make sure only one record is updated. In this example, it is assumed that no 2 entries are entered for the same date/time
 |
Configure to match the image above
Click Save to save the changes. Close the Data Link window.
Deploy the Template
To perform data entry, open the Data Entry Forms application which can be done from the command line, clicking Preview in the Template Studio or from the Project Explorer right-side Tools tab under Report, Data Entry Forms.
 |
When a record is stored, a new record is displayed. A form cannot be saved until all the required field are complete (shown in red).
When the Completed? cell is set to Yes, the record is removed from the display.