Remote Utility Installation
WIN-911 Utility applications are capable of being installed on machines other than the WIN-911 machine. This allows users to remotely manage WIN-911 via Workspace/Operator Workspace, view alarm information via Control Center, and utilize the Mobile Hub for WIN-911 Mobile connectivity when WIN-911 is installed on a non-internet connected machine.
Requirements
WIN-911 Utility application installations require the target remote machine to meet the same system requirements as the Main WIN-911 installation. Installs must be run as an account with Local Administrator permissions and SQL permissions for some utilities.
A local audio device is required for Control Center Announcer functionality.
Important
Please review the System Requirements page for supported SCADA versions and other helpful information.
Security Configurator
WIN-911 utilizes certificates to establish trust between machines with WIN-911 applications/modules installed. WIN-911 Security Configurator will be installed when a utility installation is run on a machine without Security Configurator present. The following ports will need to be open between the remote machine and WIN-911 machine where Navigation is installed:
Port(s) | Description |
|---|---|
4018 | Default port for WIN-911 certificate communication |
4020 | Default port for WIN-911 Navigation module communication |
4021-4100 | Default port for WIN-911 module communication |
TCP 1433 | MS SQL Server, modules will access the SQL Server over this port for configuration information when on the same network. Not needed when SQL is locally installed. |
TCP 1434 | MS SQL Server, modules will access the SQL Server over this port for configuration information when on different networks. See Remote SQL Access KB for configuring remote SQL access. |
Remote Installation
After confirming the remote machine meets the system requirements and the required ports are open between the remote machine and WIN-911 Navigation machine, proceed with the steps to install the desired WIN-911 Utility with step-by-step instructions below.
Control Center
Control Center allows users to monitor active alarms, historical alarms (with SQL permissions), bypass alarms and set up Announcer on the local machine. Historical view and bypass functions require the user running Control Center to have READ and WRITE permissions to the WIN-911 SQL LOG database (step 15). Step-by-step installation process listed below:
Copy the WIN911_Control.exe from the WIN-911 2023 Installation package (TOOLS folder) to the machine where you will be installing Remote WIN-911 Control Center.

Run the WIN911_Control.exe as an account with local administrator permissions.
If you receive the DotNet 6.0 is required message, click OK and then finish to abort the current installation.

Go back to the WIN-911 2023 Installation package and navigate to the Support\Redistributables folder. Copy the dotnet-sdk-6.0.403-win-x64.exe and dotnet-sdk-6.0.403-win-x86.exe files to the remote WIN-911 Operator Workspace machine.
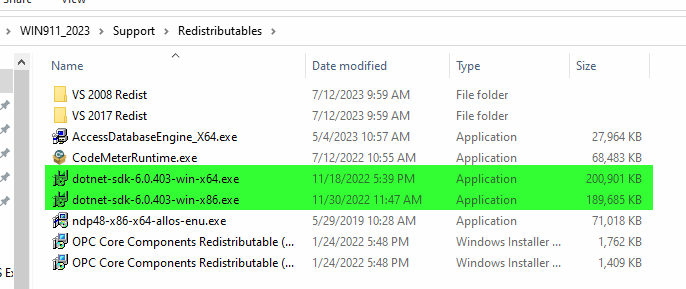
Run the dotnet executables on the Remote Operator Workspace machine. Follow the prompts to complete the installation/upgrade of DotNet. Restart the computer after installing both dotnet files.
Rerun the WIN911_Control.exe install after installing/upgrading DotNet. You will now be able to proceed with the installation.
Once the installation is completed, launch WIN-911 Security Configurator to set up the Remote Certificate trust. Enter in the IP Address (or machine name) of the WIN-911 Machine and Test the Connection under Remote Certificates.
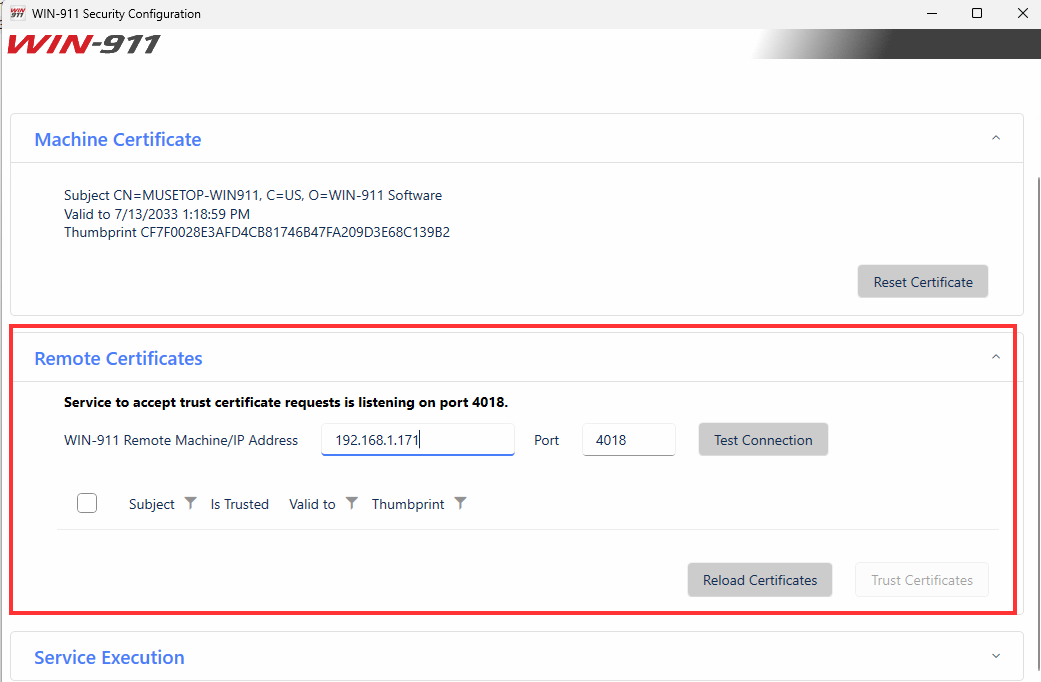
You will receive the Unable to communicate error. Now open WIN-911 Security Configuration on the WIN-911 Machine you are looking to connect to.

Test the connection from the remote WIN-911 Workspace machine after WIN-911 Security Configuration is running on both machines. You will now get a trust pop up timer.

Go to the WIN-911 Machine’s Security Configurator and trust the certificate.
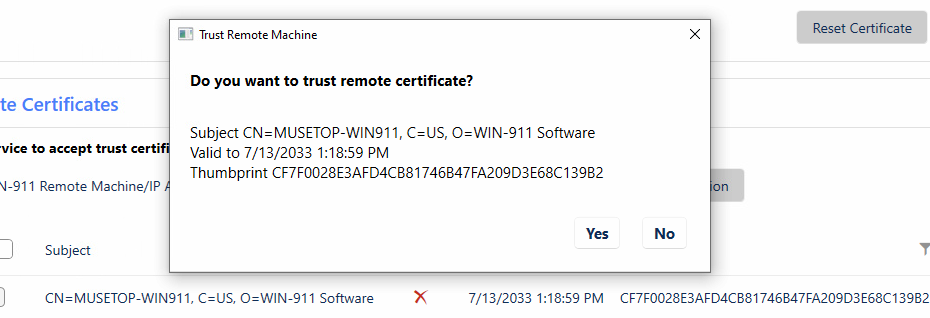
Back on the remote WIN-911 Workspace machine trust the main machine’s certificate as well.

You will now get a Successfully connected message.

Note: You may need your network administrator’s assistance to open the port shown for WIN-911 certificate communication between both machines.
Open WIN-911 Control Center and go to the Configuration page. Click the Edit pencil on the right side of the single entry.

Enter in the name for the WIN-911 System you are connecting to (anything you want), then enter in the hostname or IP Address of the WIN-911 Machine you are connecting to. Click the Test Connection to confirm connectivity.

If you get a Could not connect to Log DB message on the connection test results, then the account running WIN-911 Control Center needs to be granted permission to the WIN-911 SQL LOG database.
Please see Configure Remote Access on a SQL Server for instructions.

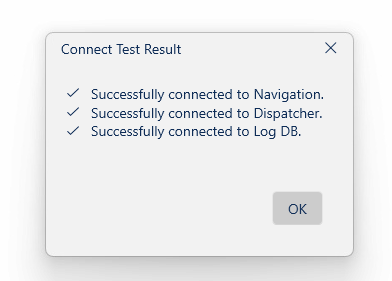
Once SQL Permissions are granted, close WIN-911 Control Center (via task tray) and re-open it. Test the connection and you should get a successful test on all 3 lines.
Mobile Hub
WIN-911 Mobile Hub is a utility installed by default on the local WIN-911 system, you can choose to remove it locally and install it on a remote machine with internet access that allows a non-internet connected WIN-911 Mobile Module installation to utilize Mobile notifications. The default port for communication between Mobile Hub and the WIN-911 Mobile Module is 59111. For more information on WIN-911 Mobile ports and communication, please review the SmartSights Mobile Security Overview. Step-by-step installation process listed below (process is the same when upgrading):
Copy Mobile_Hub.exe from the WIN-911 Installation package (TOOLS folder) to the machine where WIN-911 Mobile Hub is currently installed.

Run the executable as the account currently running the WIN-911 Mobile Hub service for upgrades, or WIN-911 services if new installation. Example on where to find the account in use:

Click Yes and then Install for the updated WIN-911 Security Configuration utility when prompted.

If you receive the DotNet 6.0 is required message, click OK and then finish to abort the current installation.
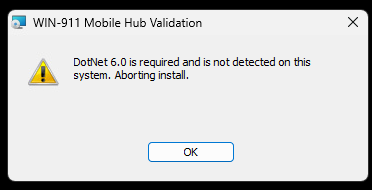
Go back to the WIN-911 Installation package and navigate to the Support\Redistributables folder. Copy the dotnet-sdk-6.0.403-win-x64.exe and dotnet-sdk-6.0.403-win-x86.exe files to the WIN-911 Mobile Hub machine.
Run the dotnet executables on the Mobile Hub machine. Follow the prompts to complete the installation/upgrade of DotNet. Restart the computer after installing both dotnet files.
Re-run the WIN-911 Mobile Hub install after installing/upgrading DotNet. You will now be able to proceed with the upgrade.
At the Logon Information page, enter in the account currently running WIN-911 Mobile Hub (from step 2)

Click Next and then Install to begin the Mobile Hub upgrade.
Once the installation is completed, launch WIN-911 Security Configurator to set up the Remote Certificate trust. Enter in the IP Address (or machine name) of the WIN-911 Machine and Test the Connection under Remote Certificates.
You will receive the Unable to communicate error. Now open WIN-911 Security Configuration on the WIN-911 Machine you are looking to connect to.
Test the connection from WIN-911 Mobile Hub machine after WIN-911 Security Configuration is running on both machines. You will now get a trust pop up timer.
Go to the WIN-911 Machine’s Security Configurator and trust the certificate.
Go to the WIN-911 Mobile Hub machine and trust the main machine’s certificate as well.
You will now get a Successfully connected message.
Note: You may need your network administrator’s assistance to open the port shown for WIN-911 certificate communication between both machines.
Test the WIN-911 Mobile Gateway and you should get a successful gateway test.

Test an alarm to confirm mobile communication is working as expected.
Workspace
WIN-911 Workspace allows remote users to completely manage and configure WIN-911 from a remote machine. The user running the WIN-911 Workspace on the remote machine requires SYSADMIN role assignment in the WIN-911 SQL Server instance. If a different version WIN-911 Workspace is already installed on this remote machine, uninstall it before proceeding with the step-by-step installation process listed below:
Copy the WIN911_Workspace.exe from the WIN-911 Installation package (TOOLS folder) to the machine where you will be installing Remote WIN-911 Workspace.
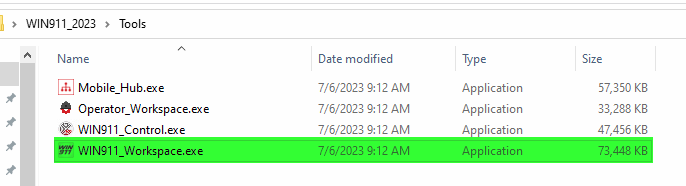
Run the WIN911_Workspace.exe as an account with local administrator permissions.
If you receive the DotNet 6.0 is required message, click OK and then finish to abort the current installation.

Go back to the WIN-911 Installation package and navigate to the Support\Redistributables folder. Copy the dotnet-sdk-6.0.403-win-x64.exe and dotnet-sdk-6.0.403-win-x86.exe files to the remote WIN-911 Workspace machine.
Run the dotnet executables on the Remote Workspace machine. Follow the prompts to complete the installation/upgrade of DotNet. Restart the computer after installing both dotnet files.
Rerun the WIN-911 Workspace install after installing/upgrading DotNet. You will now be able to proceed with the installation.
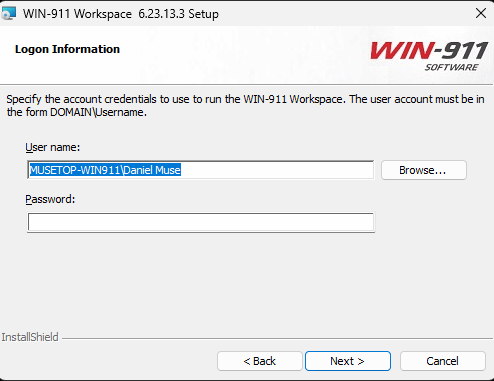
When prompted for an account, enter in an account with local administrator permissions.
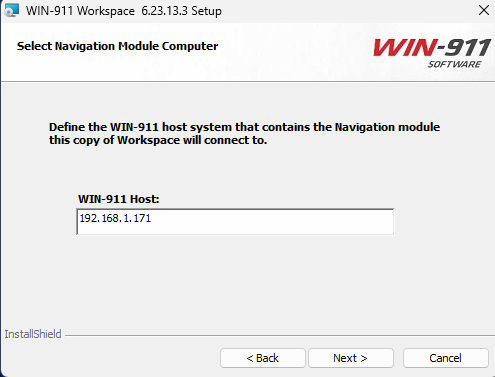
Enter in the IP address or hostname of the computer where WIN-911 is currently installed.
Click Next and then Install.
Once the installation is completed, launch WIN-911 Security Configurator to set up the Remote Certificate trust. Enter in the IP Address (or machine name) of the WIN-911 Machine and Test the Connection under Remote Certificates.
You will receive the Unable to communicate error. Now open WIN-911 Security Configuration on the WIN-911 Machine you are looking to connect to.
Test the connection from the remote WIN-911 Workspace machine after WIN-911 Security Configuration is running on both machines. You will now get a trust pop up timer.
Go to the WIN-911 Machine’s Security Configurator and trust the certificate.
Back on the remote WIN-911 Workspace machine trust the main machine’s certificate as well.
You will now get a Successfully connected message.
Note: You may need your network administrator’s assistance to open the port shown for WIN-911 certificate communication between both machines.
Open WIN-911 Workspace Launcher. Enter in the IP address or hostname of the machine where WIN-911 Navigation is installed (main machine), click Test Connection and Save connection if the result is successful.

You can now Launch Workspace through Workspace Launcher.
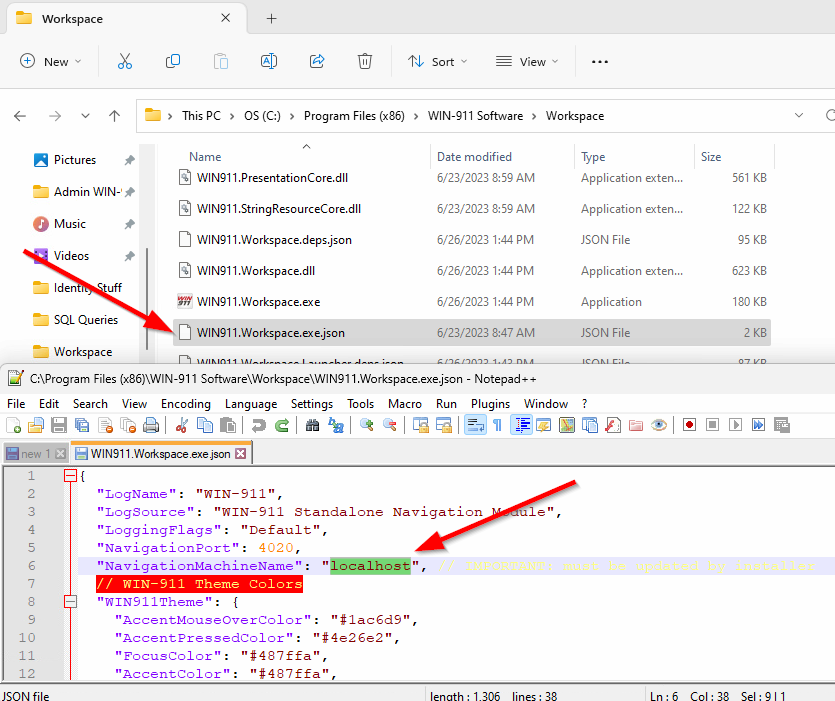
To launch Workspace from the WIN-911 Workspace and not through Workspace Launcher, on this remote machine navigate to C:\Program Files (x86)\WIN-911 Software\Workspace and edit the WIN911.Workspace.exe.json file. Change the localhost field to the IP Address of the WIN-911 Navigation machine.
Operator Workspace
Operator Workspace is a limited Workspace that only allows users access to change or modify Basic Notification Policies, connection schedules and connection roles. Creating or deleting items is not possible with Operator Workspace. If a different version WIN-911 Operator Workspace is already installed on this remote machine, uninstall it before proceeding with the step-by-step installation process listed below:
Copy the Operator_Workspace.exe from the WIN-911 Installation package (TOOLS folder) to the machine where you will be installing Remote WIN-911 Workspace.

Run the Operator_Workspace.exe as an account with local administrator permissions.
If you receive the DotNet 6.0 is required message, click No and then Cancel to abort the current installation.
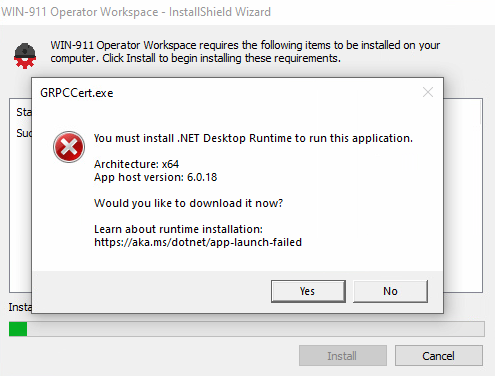
Go back to the WIN-911 Installation package and navigate to the Support\Redistributables folder. Copy the dotnet-sdk-6.0.403-win-x64.exe and dotnet-sdk-6.0.403-win-x86.exe files to the remote WIN-911 Operator Workspace machine.
Run the dotnet executables on the Remote Operator Workspace machine. Follow the prompts to complete the installation/upgrade of DotNet. Restart the computer after installing both dotnet files.
Rerun the WIN-911 Operator Workspace install after installing/upgrading DotNet. You will now be able to proceed with the installation.
Once the installation is completed, launch WIN-911 Security Configurator to set up the Remote Certificate trust. Enter in the IP Address (or machine name) of the WIN-911 Machine and Test the Connection under Remote Certificates.
You will receive the Unable to communicate error. Now open WIN-911 Security Configuration on the WIN-911 Machine you are looking to connect to.
Test the connection from the remote WIN-911 Workspace machine after WIN-911 Security Configuration is running on both machines. You will now get a trust pop up timer.
Go to the WIN-911 Machine’s Security Configurator and trust the certificate.
Back on the remote WIN-911 Workspace machine trust the main machine’s certificate as well.
You will now get a Successfully connected message.
Note: You may need your network administrator’s assistance to open the port shown for WIN-911 certificate communication between both machines.
Launch Operator Workspace and select the Another computer option. Enter in the WIN-911 Machine’s hostname or IP Address in the field and click the checkmark to save.
